Showing posts with label Macintosh. Show all posts

Sunday, July 27, 2008

Free Download Youtube with Safari

Banyak orang di dunia ini yang senang dengan youtube. Namun ternyata ada cara yang sangat mudah untuk mengunduh video di youtube. Bagaimana caranya? Cukup dengan browser safari dari Apple, dan anda bisa mengunduh video yang anda suka dari youtube sepuasnya. Bila anda belum mempunyai Apple Safari, bisa diunduh disini

Berikut langkah - langkah mudahnya
  1. Buka halaman video yang anda sukai dan ingin diunduh. Ingat, ini hanya berlaku bagi Safari. 
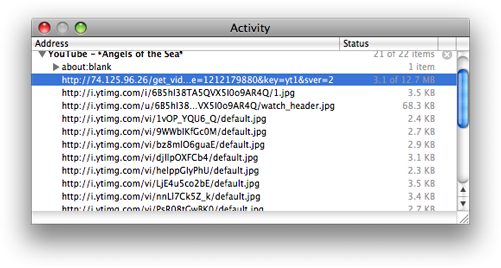
  2. Buka Activity Window di menur bar Window, lalu Activity. Atau dengan shortcut "shift + command + A". 
  3. Lihat di Activity Window Youtube anda, dan cari ukuran file yang paling besar. Ketemu? Double click on it.
  4. File tersebut akan segera muncul di Download Window anda. Yang harus anda lakukan setelah file terunduh, adalah rename file tersebut menjadi *.flv. Tanda *bisa anda isi dengan apa saja yang anda 
Dan akhirnya anda memiliki video dari youtube tersebut dengan format .flv. Bila anda ingin dengan format lain, bisa diconvert dengan aplikasi converter yang beredar pada umumnya. 

Wednesday, January 23, 2008

Leopard 10.5.2 Update Features

I think I really need to update my 10.5.1 to 10.5.2 because from the article I recently read, It contains some attractive things and support more "Apple things" like remote disc and wireless time machine using time capsule. Here is some sneak peak for 10.5.2 update I taken from babygotmac.

  1. Remote Disc Support
    This is the new feature of macbook Air because it has no optical drive. Remote disc settings has been added to 10.5.2
  2. Wireless Backup
    Time Machine can also use a disk connected to your Airport Express as a backup location. Maybe this can support Time Capsule for backing up file wirelessly
  3. Time Machine Dropdown Menu
    You can drop off Time Machine icon on your dock because now there is one on the dropdown menu bar.
  4. List view in Stacks
    I have written some information about List view in Bahasa Indonesia. But you can see the picture below

New iPod Nano Pink Edition

Apple® has announced the new pink iPod® nano to the lineup of the world’s most popular music player.

“Customers are going to love the gorgeous new pink iPod nano,” said Greg Joswiak, Apple’s vice president of Worldwide iPod Product Marketing. “The pink iPod nano is perfect for people who want a great new color this spring, or who are searching for a special Valentine’s Day gift.”
The new pink 8GB iPod nano is available worldwide soon in Apple store for a suggested retail price of $199 (US). The 4GB iPod nano is available for a suggested retail price of $149 (US).

I think you should think over again and consider this New iPod as your gift on Valentines Day.
Such a nice gift, the new iPon Nano pink edition.

Tuesday, January 22, 2008

Macbook Air : Unboxed

Just a few minutes ago, I saw some photos of The New Macbook Air unboxed. It is compared to other Notebook and it's far thinner than othe notebook. I take it from flickr from someone in Japan I guest. Here is his gallery.

Sunday, January 20, 2008

Zoom and Panning in Quicklook

I'm just realized that when we preview picture when using Quicklook, we can zoom in, zoom out, and panning. It's very easy to look at the detail of your picture quickly with quicklook.


Press space to preview images, and then hold down option key to zoom in, option + shift to zoom out and when the picture is zoomed in, just click and drag to panning.

Friday, January 18, 2008

Manila Envelope for your Macbook Air

Macbook Air is launched on Macworld Expo 2008. And I have watched the ad for Macbook air. Wow, that's incredible that notebook can fit in the manila envelope.

The surprise news for you is there is a "Manila Envelope" sleeve for your Macbook Air. It's called Airmail. It's designed by two person, one is a full time touring musician and the other one is freelance journalist.

The idea comes from the manila envelope that Steve Jobs takes out Macbook Air from. And this sleeve is really just like a standard issue manila envelope. They're lined with fleece and even feature a tie enclosure. If I only see the picture, I can't decide weather it is Airmail or it is a standard manila envelope.

What does this things made of?

The AirMail laptop sleeve is handmade out of durable upholstery-grade vinyl, and lined with fuzzy, soft fleece. All AirMail sleeves have the same dimensions as standard interoffice manila envelopes, which will serve to remind you -- and everyone around you -- that your new MacBook Air really is the thinnest laptop in the world! (Airmail)
I'm sure it will really fit in your Macbook air. And to beautify while protecting your Macbook Air, you only spend about $29.95 to pre-order and it shipped in two weeks when Macbook Air does

Wednesday, January 16, 2008

The New Macbook Air

About few hours ago, I watched The live report from Macworld Expo and Steve Jobs officially launched the Macbook Air.

There were 4 things that Steve Jobs Officially Launched. First is the the new Time Capsule. It will accompany your Time Machine Features on your Leopard to backup files wirelessly

Second is some new features that added to iPhone and iPod touch. I'm so happy that my iPod touch has Mail.app in the body so I can organize my email from whereever I want. And there is Maps.app on my iPod. Unfortunately I have to pay about $20 for that update while iphone is free.. So sad to hear that. It need new version of iTunes to update that.

Third is Apple launched iTunes Movie Rentals. I think it is so crazy that we can rent a film online. But I still thinking how Apple secure their connection and make sure that no one can break the rules about renting.

The fourth is the most exciting things. "There is something In the air" That's the slogan. And It is true. The New Macbook Air was designed like a paper. It is the world's thinnest notebook. Steve Jobs calls it "The wireless machine". It's true because with Time capsule, you can backup your file wirelessly, With iTunes Movie Rental, you can watch movies wirelessly (By using internet), and so on. Make sure you check the technical Specs here.

With these 4 of new release of "Apple Things", Apple make a leap change in how we watch movie, creating document in the notebook that like a piece of paper, and so on.

I really consider all Apple things to furnished my own house someday because it's really integrating between one and another. It's so cool.


Regards

Robert

Thursday, January 10, 2008

Finder Sidebar Separators


Here's a nifty idea to organize your finder sidebar. Since there are not any separators supported by finder, one man created This creative finder separators to keep your Finder sidebar look tidy. The idea of this separators is creating some fake applications whose icons are transparent and whose names consist of line characters. You can then drag and drop these on the sidebar to give the desired effect.

This trick will keep your finder sidebar visually tidy. The package contains some separators and Apple script that will open your terminal at the location of folder you dropped on it

Wednesday, January 9, 2008

How to Convert a MacOS X 10.5 Leopard Upgrade DVD into a Retail MacOS X 10.5 Leopard

Sekarang ini, setiap pembelian iMac, Macbook, Macbook Pro, dan komputer Macintosh baru lainnya, akan dibundel dengan OSX Leopard. Termasuk yang berkekuatan Penryn. Wow.. Kalau bisa dapat Upgrade gratis ini, untuk apa susah payah membeli yang versi retail dengan harga sekitar Rp 1.200.000 untuk versi Single pack dan Rp 2.200.000 untuk versi family pack?


Tapi tunggu dulu. Ada sedikit perbedaan antara versi retail dan versi yang dibundel oleh iMac, Macbook, dan mesin Macintosh lainnya. Mac OSX Leopard yang dibundel hanya bisa diinstall pada mesin yang sejenis. Artinya harus sama persis dengan mesin yang dibundelkan.

Saya contohkan. Misalnya saya membeli Macbook Black dengan spesifikasi yang tersedia. Lalu kita mendapatkan DVD Leopard Upgrade. DVD ini hanya bisa diinstall pada Macbook black. Artinya bila kita punya Macbook pro yang masih ber-OS Tiger (10.4.xx), kita tidak dapat melakukan upgrade ke Leopard (10.5.0) dengan DVD yang dibundel oleh Macbook black tadi. Untuk melakukan upgrade, harus dari Leopard versi retail (Yang harganya Rp 1.200.000 untuk Single Pack dan Rp 2.200.000 untuk Family Pack).

Tapi ternyata ada triknya untuk membuat DVD versi bundel ini menjadi versi retail sehingga bisa dipakai untuk mengupgrade Macintosh yang lain. Tetapi perlu diingat, trik ini jangan sampai disalahgunakan untuk hal - hal yang ilegal dalam arti hanya digunakan untuk kepentingan pribadi dan kemudahan pribadi belaka. Penasaran bagaimana caranya? Ikuti petunjuk saya dibawah ini.

  1. Masukkan Licensed DVD 10.5.0 Leopard ke dalam Mac anda
  2. Buka Disk Utility. Bila tidak tahu letaknya, biar saya beritahu. MacintoshHD/application/utilities/disk utility
  3. Di disk utility, pilih disk installer leopard di sidebar, lalu pilih new image
  4. Setting volumenya pada "8GB (DVD+R DL)
  5. Pilih destination dan sourcenya. Lalu ok
  6. Macintosh akan membuatkan disk image baru dari DVD Leopard anda. Ini akan memakan waktu yang cukup lama.
  7. Setelah selesai, keluarkan DVD aslinya
  8. Buka disk image outputnya
  9. Wow, foldernya hanya sedikit dan tampaknya itu bukan installernya. Tenang, itu hanya 'disembunyikan' jadi kita harus membuka hidden file
  10. Cara membuka hidden file, buka terminal (MacintoshHD/application/utilities/terminal) lalu ketikkan perintah berikut ini :

    defaults write com.apple.finder AppleShowAllFiles True

  11. Tekan enter. Kode tersebut sudah aktif, tapi belum muncul tanda - tanda terbukanya hidden file. Artinya finder harus direlaunch. Caranya ketik kode berikut ini pada baris berikutnya di terminal :

    Killall Finder

  12. Sudah selesai, hidden file sudah terbuka.
  13. Masuk ke disk image yang sudah dimounting, lalu masuk kesini :
    /Volumes/Mac OS X Install DVD/System/Installation/CDIS/
  14. Klik kanan pada "Mac OS X Installer" dan pilih 'Show Package Contents'
  15. Akan terbuka jendela baru, lalu navigasi ke Contents/Resources lalu delete file “CheckForOSX”
  16. Sekarang disk imagenya direname dengan nama Mac OS X Install DVD
  17. Burn disk image tersebut dari disk utility.
Sekarang anda sudah memiliki DVD installer Mac OS X Leopard versi retail yang dapat diinstall di Macintosh lainnya.

Selamat mencoba. Artikel ini diterjemahkan dari uneasysilence.com


Salam Macintosh

Tuesday, January 8, 2008

Apple With Penryn

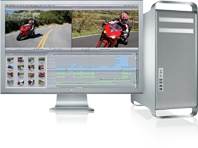
The new era of architecture 45 nM has arrived to apple product. This new proccessor will be implemented in the new Macbook Pro, Mac Pro, and X serve as the greatest Mac machine.

Apple today revised the Mac Pro and Xserve with a new architecture and the recently released Penryn Processors. The Mac Pro combines two 45-nm Quad-Core Xeon processors running up to 3.2GHz and up to 4TB of internal storage. The standard 8-core configuration starts at $2799.

"The new Mac Pro is the fastest Mac we've ever made," said Philip Schiller, Apple's senior vice president of Worldwide Product Marketing. "With 3.2 GHz 8-core Xeon processing, a 1600 MHz front side bus and 800 MHz memory, the new Mac Pro uses the fastest Intel Xeon architecture on the market."
The new Mac Pro features the latest Quad-Core Intel Xeon 5400 series processors based on 45nm Intel Core (Penryn) microarchitecture running up to 3.2 GHz, each with 12MB of L2 cache per processor. According to Apple, the 1600 MHz front side bus and 800 MHz DDR2 ECC FB-DIMM memory achives a 61 percent increase in memory throughput.

The new Mac Pro comes standard with the ATI Radeon HD 2600 XT graphics card with 256MB of video memory.

The standard 8-core Mac Pro, with a suggested retail price of $2,799 (US), includes:

- two 2.8 GHz Quad-Core Intel Xeon processors with dual-independent 1600 MHz front side buses;
- 2GB of 800 MHz DDR2 ECC fully-buffered DIMM memory, expandable up to 32GB;
- ATI Radeon HD 2600 XT with 256MB of GDDR3 memory;
- 320GB Serial ATA 3Gb/s hard drive running at 7200 rpm;
- 16x SuperDrive(TM) with double-layer support (DVD+/-R DL/DVD+/-RW/CD-RW);
- two PCI Express 2.0 slots and two PCI Express slots;
- Bluetooth 2.0+EDR; and
- ships with Apple Keyboard and Mighty Mouse.

Apple also revised the Xserve today with the same architecture. Xserve standard configuration, with a suggested retail price of $2,999 (US), includes:

- a single 64-bit 2.8 GHz Quad-Core Xeon processor with 12MB of L2 cache and a 1600 Mhz front side bus;
- 2GB of 800 MHz DDR2 ECC FB-DIMM RAM, expandable up to 32GB;
- a single 80GB SATA Apple Drive Module;
- dual Gigabit Ethernet on-board;
- internal graphics;
- two FireWire(R) 800 and three USB 2.0 ports; and
- an unlimited client license for Mac OS X Server version 10.5 Leopard.


What about MacbookPro? Now, Macbook pro has Santa Rosa in its body since June 5th 2007
But according to appleinsider, the chips scheduled to launch in January will have the model names X9000 for the 2.8GHz CPU, T9500 for the 2.6GHz, T9300 for the 2.5GHz, T8300 for the 2.4GHz and T8100 for the 2.1GHz. They'll be priced at $851, $530, $316, $241 and $209 in 1000-unit tray quantities, respectively. All five of the chips will continue to make use of an 800MHz front-side bus like those in the current iteration of Apple's MacBook Pro line.

Of the five chips, the X9000 2.8GHz model is considered a mobile Core 2 Extreme processor, and it's unclear if Apple has any plans for that variant in a notebook system. In its brief history of using Intel processors, the Cupertino-based company has shied away from using the pricier, more power-hungry Extremes in its streamlined portable systems.

On the other hand, the upcoming T9500 2.6GHz and T9300 2.5GHz Penryn chips are slated to arrive at exactly the same price points ($530 and $316) as the T7700 2.4GHz and T7500 2.2GHz Merom-based processors currently situated in the Mac maker's Santa Rosa-based MacBook Pro line, almost assuring their adoption in next year's models. The 2.6GHz and 2.5GHz chips will also sport 6MB of L2 Cache, differentiating them the 2.4GHz and 2.1GHz models, which contain only 3MB of L2 Cache.

Expectations for the next refresh to Apple's consumer-oriented 13-inch MacBook notebooks are less certain, however. Since the MacBook did not make the jump to Intel's Santa Rosa platform earlier this year, Apple effectively holds two options for progressing the portable line -- it could introduce a more cost-effective 65nm Merom-based line in the coming months or alternatively make the leap to the fresher 45nm Penryn-based chips early next year.

Quicklook Plug In

A couple days ago, my friend post something on my mailing list that asking about File that is supported by quicklook in Leopard. And I try to search about it. And what I find out is there are many files that is not supported by Quicklook, but you can add some plug in so that Quicklook can preview your file faster.
With a little effort of course, you can add something to your Quicklook. Here's how.

  1. Identify files on remote machines. I've been using Remote Desktop at my day job for a couple of years now. With a few clicks, I can observe or control a remote Mac. Leopard brings this convenience to home users with Screen Sharing. It's useful, but files appear quite tiny when viewed on this screen-within-a-screen (and titles even smaller). Fortunately, Quick Look makes things much more legible.
  2. Preview the contents of Zip files (plug-in required). BetterZip and the Zip Quick Look Plug-in both let you view the contents of a zipped file with Quick Look. In fact, Zip Quick Look's display is dependent on a HTML file which you may alter to your liking. Here's how to install Quick Look plug-ins.
  3. Preview the contents of a folder (plug-in required). Much like BetterZip and Zip Quick Look, the Folder List plug-in lets you preview the contents of a folder. You can also customize its HTML-powered display and show or hide hidden files or time stamps.
  4. Examine snippets of code with syntax highlighting intact. Here's another tip that requires a plug-in. Qlcolorcode lets you preview your code with all the helpful highlighting you expect.
  5. Examine files in the trash. Until Leopard, the Finder's trash would keep its contents to itself. Anything you wanted to examine had to be moved back to the desktop. Fortunately, Quick Look lets you preview trashed items. Now you know precisely which item to yank out of there.
  6. Prep your iWork documents for use with Quick Look. When you create a document with Numbers, Pages or Keynote, you can ensure that its preview will display the proper formatting by selecting the Include Preview in Document check box whey you save (or turn this feature on by default in the general preference pane).
  7. Enhance TextMate. TextMate is the editor that geeks everywhere love (including the geeks at TUAW). CiarĂ¡n Walsh has written two Quick Look plug-ins for TextMate that let you preview items in a project or render Quick Look previews (for certain file types) using the TextMate syntax highlighter, respectively.
  8. Preview fonts. Open a Finder window, select Cover Flow view and navigate to the font you're interested in. Click the space bar and presto! Instant preview.
  9. Quick Look and Cover Flow. I love the combination of Cover Flow and Quick Look. Open a bulging folder in the Finder and select Cover Flow view. Tap the space bar to preview the 1st file and then use the arrow keys to move the next one and so on. You'll stay in Quick Look mode! Very cool.
  10. Send images to iPhoto. When viewing an image with Quick Look - either from the Finder or attached to a Mail message - you'll see a tiny iPhoto icon at the bottom of the window. Click it to send that image to iPhoto.

Monday, January 7, 2008

Renaming Dictionaries

While working with Dictionary this weekend, I discovered that you can rename the dictionaries, as you can see in this screenshot:


To rename a dictionary, just Control-click on its name and choose Edit Label from the pop-up menu -- there's also a Revert to Original Label option, for when you decide the default names are fine. I'm not sure exactly why one might want to do this, though -- perhaps if you've installed another dictionary and want to give it a unique name?

Sunday, January 6, 2008

Apple Script : Photoshop Batch Resizer

It's easy to put together a batch process in Photoshop to resize all the images in a folder to a certain height or width. However, if some of the photos are portraits and some are landscapes, they end up at different sizes. This script determines which dimension is the longest one and resizes that dimension to the specified number of pixels (set by the user).

set target_size to text returned of (display dialog "Enter target size of longest side in pixels:" default answer 2400)
set raw_folder to choose folder with prompt "Select originals folder:"
set live_folder to choose folder with prompt "Select target folder:"
tell application "Finder"
set itemList to files in raw_folder
end tell
repeat with an_item in itemList
tell application "Finder"
set current to an_item as alias
end tell

tell application "Adobe Photoshop CS"
activate
open current
set this_image to current document
set long_side to height of current document
set long_side_identity to 1
if width of current document > long_side then set long_side_identity to 2
if width of current document > long_side then set long_side to width of current document
if long_side > target_size as integer and long_side_identity = 1 then
resize image this_image height target_size as integer
end if
if long_side > target_size as integer and long_side_identity = 2 then
resize image this_image width target_size as integer
end if
tell current document
save as JPEG in live_folder
close
end tell
end tell
end repeat
This is set to save the images as JPEGs in Adobe Photoshop CS -- if you want it to save them in some other format, just change the line Save as JPEG in live_folder to Save as TIFF..., Save as Photoshop format..., Save as Photoshop EPS..., etc. (See the AppleScript dictionary for Photoshop for a complete list of formats.) If you want to use this script in Adobe CS3, change the line tell application "Adobe Photoshop CS"

Thanks to macosxhints for tips and tricks

Data Detector in Leopard's iChat

About 60 seconds ago, i read something tickling me about data detector from one of my source.

You can enable Data Detectors in iChat with one simple command in Terminal:

defaults write com.apple.iChat EnableDataDetectors 1

You can disable it using the same command, but change the '1' to a '0.' Now you get the fun job of calling your closest Mac-using relative and explaining Terminal so they can use a feature that Apple hid from public view for what I can only assume were valid reasons. I hope your aunt has her screen-sharing figured out.

Saturday, December 29, 2007

iPhone Perhaps Getting GPS


GPS pada iPhone atau iPod touch? Sebentar lagi akan ada accessories pendukungnya. Accessories yang dirilis oleh partfoundry ini diberi nama Loco GPS. Alat ini khusus dibuat untuk iPhone dan iPod Touch. Jadi, siap - siap saja merogoh kocek lebih untuk alat yang satu ini. Harganya sekitar US $89. Mmh, menarik?


10.5.2 Fixes : Stacks

Apple sebentar lagi akan merilis update dari Leopard yang terbaru, yakni 10.5.2. Salah satu perubahan yang akan terjadi adalah penambahan List view dari Stacks. Seperti dikutip dari appleinsider, akan ada beberapa update untuk Data Detectors, the Mac OS X Dock, the Finder, grammar checking, iCal, iChat, Mail, Parental Controls, Quick Look, Rosetta, Safari, Time Machine, and Leopard's 802.11 AirPort implementation.

It will make some changes in our way to access files in dock. Harapannya ke depan supaya MacOS X Leopard semakin garang dan semakin bertenaga untuk digunakan pada pekerjaan sehari - hari

Salam

Thursday, December 27, 2007

Leopard's Screen sharing into Apple remote Desktop?

Seperti yang kita ketahui, Leopard memiliki fitur terbaru, yakni Screen Sharing antar komputer. Namun muncul pertanyaan, apa bedanya dengan apple remote desktop yang sudah dirilis apple terlebih dahulu? Saya mencoba mencari artikel tentang ini dan saya mendapatkannya. Memang screen sharing tidak bisa menjadi apple remote desktop, tapi paling tidak bisa didapat sebuah apple remote desktop versi lite. Berikut caranya.

  1. Cari aplikasi screen sharing lalu letakkan di dock. Bila tidak tahu lokasinya ada dimana, coba cari disini : /System/Library/CoreServices/Screen Sharing.app
  2. Buka terminal, lalu jalankan perintah berikut :
    defaults write com.apple.ScreenSharing ShowBonjourBrowser_Debug 1
Maka sekarang anda akan dapat membuka screen sharing dan melihat komputer - komputer yang terhubung dengan komputer anda dan bisa anda kendalikan.

Salam Macintosh

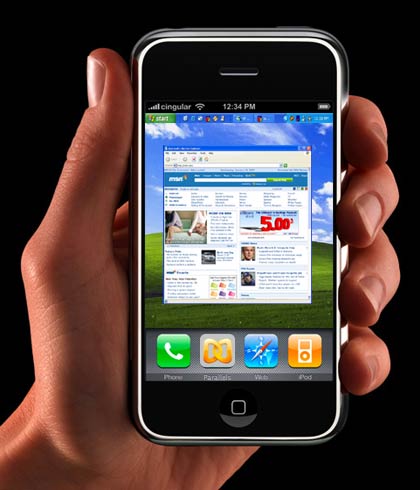
Parallels di iPhone


iPhone berbasis Mac OS X kan? Jadi secara teori, bisa gak ya menjalankan windows di iPhone?

Sunday, October 28, 2007

MacOS Leopard Ala PC


Leopard baru dirililis 26 Oktober yang lalu, atau tepatnya 2 hari yang lalu. Hari ini (28 Oktober) saya membaca sebuah artikel dari dailyapps yang menjelaskan secara gamblang bagaimana menginstall Leopard Di PC

Bagaimanapun Mac dan OSX merupakan satu kesatuan. Seperti Roti dan selai nanas kesukaan saya. Tetapi sekarang OSX didesign untuk dapat berjalan pada prosesor Intel, prosesor yang digunakan oleh kebanyakan komputer non-Apple. Jadi bukanlah hal yang aneh bila Leopard dapat berjalan di PC biasa. DailyApps menjabarkan cara menginstall Leopard dalam 3 langkah lengkap dengan hardware tambahan yang diperlukan. Dari forum OSX86 malah memberikan tools - toolsnya untuk didownload. Jika anda tertarik, anda dapat membacanya dan mencobanya.

Tetapi percayalah, OSX tanpa Mac akan terasa tidak enak sama seperti makan roti tanpa selai nanas.

Friday, October 19, 2007

300+ New Feature : MacOS 10.5 Leopard


Tanggal 26 Oktober 2007, Apple akan merilis OS terbaru, yakni Leopard. Dari situs Apple.com, saya membaca mengenai 300 fitur terbaru dari Leopard. Saya tertarik dengan beberapa fitur terbaru dari Leopard ini. Yang menarik adalah Fitur backdrop effect pada ichat dan Burst Mode seperti di Handphone Sony Ericsson dengan fitur Cybershot.


Fitur Backdrop Effect pada ichat - Fool your buddy with different environment


Fitur Burst Mode pada Photo Booth - Shoot yourself with different style