Showing posts with label Tips And Tricks. Show all posts

Saturday, April 5, 2008

Flock and Twitter

Saya baru mencoba membuat sebuah account twitter yang baru. Masih bingung bagaimana menggunakannya. Pada hari yang sama, saya juga mendownload browser baru, yakni flock. Tulisan ini saya posting dari flock.

Flock memiliki fitur - fitur yang unik dan mendukung berbagai social networking ternama di dunia. Sebut saja facebook, flickr, photobucket, blogger, dll.. Interface dari mozzila, sehingga cara kerjanya sangat mrip dengan browser kenamaan keluaran mozzila, yakni firefox.. Sungguh browser yang menarik untuk dicoba..

Blogged with the Flock Browser

Sunday, January 20, 2008

Zoom and Panning in Quicklook

I'm just realized that when we preview picture when using Quicklook, we can zoom in, zoom out, and panning. It's very easy to look at the detail of your picture quickly with quicklook.


Press space to preview images, and then hold down option key to zoom in, option + shift to zoom out and when the picture is zoomed in, just click and drag to panning.

Thursday, January 10, 2008

Finder Sidebar Separators


Here's a nifty idea to organize your finder sidebar. Since there are not any separators supported by finder, one man created This creative finder separators to keep your Finder sidebar look tidy. The idea of this separators is creating some fake applications whose icons are transparent and whose names consist of line characters. You can then drag and drop these on the sidebar to give the desired effect.

This trick will keep your finder sidebar visually tidy. The package contains some separators and Apple script that will open your terminal at the location of folder you dropped on it

Wednesday, January 9, 2008

How to Convert a MacOS X 10.5 Leopard Upgrade DVD into a Retail MacOS X 10.5 Leopard

Sekarang ini, setiap pembelian iMac, Macbook, Macbook Pro, dan komputer Macintosh baru lainnya, akan dibundel dengan OSX Leopard. Termasuk yang berkekuatan Penryn. Wow.. Kalau bisa dapat Upgrade gratis ini, untuk apa susah payah membeli yang versi retail dengan harga sekitar Rp 1.200.000 untuk versi Single pack dan Rp 2.200.000 untuk versi family pack?


Tapi tunggu dulu. Ada sedikit perbedaan antara versi retail dan versi yang dibundel oleh iMac, Macbook, dan mesin Macintosh lainnya. Mac OSX Leopard yang dibundel hanya bisa diinstall pada mesin yang sejenis. Artinya harus sama persis dengan mesin yang dibundelkan.

Saya contohkan. Misalnya saya membeli Macbook Black dengan spesifikasi yang tersedia. Lalu kita mendapatkan DVD Leopard Upgrade. DVD ini hanya bisa diinstall pada Macbook black. Artinya bila kita punya Macbook pro yang masih ber-OS Tiger (10.4.xx), kita tidak dapat melakukan upgrade ke Leopard (10.5.0) dengan DVD yang dibundel oleh Macbook black tadi. Untuk melakukan upgrade, harus dari Leopard versi retail (Yang harganya Rp 1.200.000 untuk Single Pack dan Rp 2.200.000 untuk Family Pack).

Tapi ternyata ada triknya untuk membuat DVD versi bundel ini menjadi versi retail sehingga bisa dipakai untuk mengupgrade Macintosh yang lain. Tetapi perlu diingat, trik ini jangan sampai disalahgunakan untuk hal - hal yang ilegal dalam arti hanya digunakan untuk kepentingan pribadi dan kemudahan pribadi belaka. Penasaran bagaimana caranya? Ikuti petunjuk saya dibawah ini.

  1. Masukkan Licensed DVD 10.5.0 Leopard ke dalam Mac anda
  2. Buka Disk Utility. Bila tidak tahu letaknya, biar saya beritahu. MacintoshHD/application/utilities/disk utility
  3. Di disk utility, pilih disk installer leopard di sidebar, lalu pilih new image
  4. Setting volumenya pada "8GB (DVD+R DL)
  5. Pilih destination dan sourcenya. Lalu ok
  6. Macintosh akan membuatkan disk image baru dari DVD Leopard anda. Ini akan memakan waktu yang cukup lama.
  7. Setelah selesai, keluarkan DVD aslinya
  8. Buka disk image outputnya
  9. Wow, foldernya hanya sedikit dan tampaknya itu bukan installernya. Tenang, itu hanya 'disembunyikan' jadi kita harus membuka hidden file
  10. Cara membuka hidden file, buka terminal (MacintoshHD/application/utilities/terminal) lalu ketikkan perintah berikut ini :

    defaults write com.apple.finder AppleShowAllFiles True

  11. Tekan enter. Kode tersebut sudah aktif, tapi belum muncul tanda - tanda terbukanya hidden file. Artinya finder harus direlaunch. Caranya ketik kode berikut ini pada baris berikutnya di terminal :

    Killall Finder

  12. Sudah selesai, hidden file sudah terbuka.
  13. Masuk ke disk image yang sudah dimounting, lalu masuk kesini :
    /Volumes/Mac OS X Install DVD/System/Installation/CDIS/
  14. Klik kanan pada "Mac OS X Installer" dan pilih 'Show Package Contents'
  15. Akan terbuka jendela baru, lalu navigasi ke Contents/Resources lalu delete file “CheckForOSX”
  16. Sekarang disk imagenya direname dengan nama Mac OS X Install DVD
  17. Burn disk image tersebut dari disk utility.
Sekarang anda sudah memiliki DVD installer Mac OS X Leopard versi retail yang dapat diinstall di Macintosh lainnya.

Selamat mencoba. Artikel ini diterjemahkan dari uneasysilence.com


Salam Macintosh

Tuesday, January 8, 2008

Quicklook Plug In

A couple days ago, my friend post something on my mailing list that asking about File that is supported by quicklook in Leopard. And I try to search about it. And what I find out is there are many files that is not supported by Quicklook, but you can add some plug in so that Quicklook can preview your file faster.
With a little effort of course, you can add something to your Quicklook. Here's how.

  1. Identify files on remote machines. I've been using Remote Desktop at my day job for a couple of years now. With a few clicks, I can observe or control a remote Mac. Leopard brings this convenience to home users with Screen Sharing. It's useful, but files appear quite tiny when viewed on this screen-within-a-screen (and titles even smaller). Fortunately, Quick Look makes things much more legible.
  2. Preview the contents of Zip files (plug-in required). BetterZip and the Zip Quick Look Plug-in both let you view the contents of a zipped file with Quick Look. In fact, Zip Quick Look's display is dependent on a HTML file which you may alter to your liking. Here's how to install Quick Look plug-ins.
  3. Preview the contents of a folder (plug-in required). Much like BetterZip and Zip Quick Look, the Folder List plug-in lets you preview the contents of a folder. You can also customize its HTML-powered display and show or hide hidden files or time stamps.
  4. Examine snippets of code with syntax highlighting intact. Here's another tip that requires a plug-in. Qlcolorcode lets you preview your code with all the helpful highlighting you expect.
  5. Examine files in the trash. Until Leopard, the Finder's trash would keep its contents to itself. Anything you wanted to examine had to be moved back to the desktop. Fortunately, Quick Look lets you preview trashed items. Now you know precisely which item to yank out of there.
  6. Prep your iWork documents for use with Quick Look. When you create a document with Numbers, Pages or Keynote, you can ensure that its preview will display the proper formatting by selecting the Include Preview in Document check box whey you save (or turn this feature on by default in the general preference pane).
  7. Enhance TextMate. TextMate is the editor that geeks everywhere love (including the geeks at TUAW). CiarĂ¡n Walsh has written two Quick Look plug-ins for TextMate that let you preview items in a project or render Quick Look previews (for certain file types) using the TextMate syntax highlighter, respectively.
  8. Preview fonts. Open a Finder window, select Cover Flow view and navigate to the font you're interested in. Click the space bar and presto! Instant preview.
  9. Quick Look and Cover Flow. I love the combination of Cover Flow and Quick Look. Open a bulging folder in the Finder and select Cover Flow view. Tap the space bar to preview the 1st file and then use the arrow keys to move the next one and so on. You'll stay in Quick Look mode! Very cool.
  10. Send images to iPhoto. When viewing an image with Quick Look - either from the Finder or attached to a Mail message - you'll see a tiny iPhoto icon at the bottom of the window. Click it to send that image to iPhoto.

Monday, January 7, 2008

Renaming Dictionaries

While working with Dictionary this weekend, I discovered that you can rename the dictionaries, as you can see in this screenshot:


To rename a dictionary, just Control-click on its name and choose Edit Label from the pop-up menu -- there's also a Revert to Original Label option, for when you decide the default names are fine. I'm not sure exactly why one might want to do this, though -- perhaps if you've installed another dictionary and want to give it a unique name?

Sunday, January 6, 2008

Apple Script : Photoshop Batch Resizer

It's easy to put together a batch process in Photoshop to resize all the images in a folder to a certain height or width. However, if some of the photos are portraits and some are landscapes, they end up at different sizes. This script determines which dimension is the longest one and resizes that dimension to the specified number of pixels (set by the user).

set target_size to text returned of (display dialog "Enter target size of longest side in pixels:" default answer 2400)
set raw_folder to choose folder with prompt "Select originals folder:"
set live_folder to choose folder with prompt "Select target folder:"
tell application "Finder"
set itemList to files in raw_folder
end tell
repeat with an_item in itemList
tell application "Finder"
set current to an_item as alias
end tell

tell application "Adobe Photoshop CS"
activate
open current
set this_image to current document
set long_side to height of current document
set long_side_identity to 1
if width of current document > long_side then set long_side_identity to 2
if width of current document > long_side then set long_side to width of current document
if long_side > target_size as integer and long_side_identity = 1 then
resize image this_image height target_size as integer
end if
if long_side > target_size as integer and long_side_identity = 2 then
resize image this_image width target_size as integer
end if
tell current document
save as JPEG in live_folder
close
end tell
end tell
end repeat
This is set to save the images as JPEGs in Adobe Photoshop CS -- if you want it to save them in some other format, just change the line Save as JPEG in live_folder to Save as TIFF..., Save as Photoshop format..., Save as Photoshop EPS..., etc. (See the AppleScript dictionary for Photoshop for a complete list of formats.) If you want to use this script in Adobe CS3, change the line tell application "Adobe Photoshop CS"

Thanks to macosxhints for tips and tricks

Data Detector in Leopard's iChat

About 60 seconds ago, i read something tickling me about data detector from one of my source.

You can enable Data Detectors in iChat with one simple command in Terminal:

defaults write com.apple.iChat EnableDataDetectors 1

You can disable it using the same command, but change the '1' to a '0.' Now you get the fun job of calling your closest Mac-using relative and explaining Terminal so they can use a feature that Apple hid from public view for what I can only assume were valid reasons. I hope your aunt has her screen-sharing figured out.

Sunday, December 30, 2007

Share Your Internet Connection with Others

Beberapa hari yang lalu saya berhasil mensetting Wireless connection dan membagi koneksi internet saya untuk beberapa komputer yang ada di rumah saya. Mungkin saya bisa membagikan sedikit pengalaman saya.

Pertama - tama saya akan menjelaskan peralatan apa saja yang dibutuhkan.

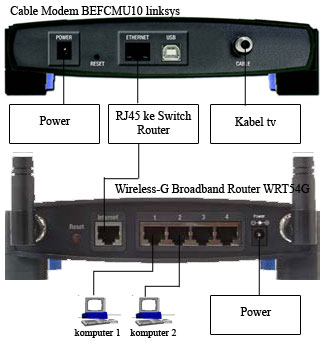
  1. 1 buah cable modem (contoh: Cable Modem with USB and Ethernet Connections BEFCMU10)
  2. 1 buah switch router 4 port (contoh: Wireless-G Broadband Router WRT54G)
  3. Kabel LAN secukupnya, Kategori secukupnya adalah di sesuaikan dengan jarak modem ke router dan jarak router ke komputer.
Jika benda - benda tersebut sudah tersedia, tinggal melanjutkan langkah - langkah pemasangan hardware.

Bagan Jaringan
  1. Hubungkan kabel dari ISP anda ke cable modem
  2. Hubungkan power
  3. Sambungkan kabel LAN dari cable modem ke router di port internet
  4. Sambungkan salah satu port ke LAN card di komputer anda
Menurut pengalaman saya sebagai pengguna fastnet, cara diatas harus dilakukan bertahap dalam artian tidak bisa sekaligus karena penggunaan fastnet berdasarkan MAC address. MAC Address (Media Access Control) adalah sebuah alamat jaringan yang diimplementasikan pada lapisan data-link dalam tujuh lapisan model OSI, yang merepresentasikan sebuah node tertentu dalam jaringan. Karena itu saya membaginya dalam 3 tahapan yang dijelaskan secara rinci.

Tahap pertama :
Sambungkan kabel LAN dari wireless router anda ke LAN card di PC. Lalu buka web browser
Ketik 192.168.1.1 di address bar anda. Kalau error, coba 192.168.0.1. Masukkan
  • username : admin
  • password : admin
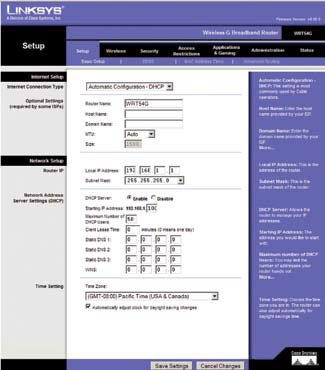
Lalu akan tampil halaman seperti berikut :

Ingat, setiap mau pindah halaman, pastikan anda mengklik tombol "Save Settings"
A. Setup - MAC Address Clone
Enable -> Klik "Clone Your PC MAC" Nanti MAC address dari PC anda akan otomatis diclone.

kenapa MAC perlu di clone? karena beberapa ISP mencatat MAC LAN card yang di pakai untuk terhubung ke internet. kalau MAC nya tidak di clone maka MAC nya akan lain dengan yang tercatat oleh ISP sehingga tidak akan mendapatkan IP dari DHCP server. karena di anggap berbeda.

B. Setup - Basic Setup
Internet Setup
pilih yang Automatic Configuration - DHCP,

Network Setup
Router IP 192.168.1.1
Network Address Server Settings (DHCP)

C. Wireless - Basic Wireless Settings
Wireless Network
Wireless Network Mode : mixed
Wireless Network Name (SSID) : Nama Jaringan anda. Misalkan "My WLAN"
Wireless Channel: channel yang mau dipakai WLAN anda, default saja dulu
Wireless SSID Broadcast : network namenya di sebarkan atau tidak, untuk sementara di enabled saja dulu (recomended :setelah bisa konek dengan sukses sebaiknya di disable agar tetangga anda tidak mendeteksi network anda)

D. Wireless - Wireless Security
Security Mode : Gunanya untuk memberi password pada Jaringan wireless anda supaya tidak sembarangan orang bisa masuk. Bisa dipilih WEP atau WAP sebagai pilihannya.

Tahap pertama sudah selesai, artinya jaringan anda sudah terbentuk. Tetapi tunggu dulu, sambungan ke modemnya belum dibentuk. Setelah tahap pertama selesai dan berjalan sebagaimana mestinya, kita tinggal menambahkan modem, supaya aliran data internet masuk ke jaringan yang sudah kita atur.

Tahap kedua :
Setting di PC anda. Ini juga penting supaya PC anda dapat menerima IP dari Wireless router anda.
Start -> Settings -> Control Panels -> Network Connections
Klik kanan -> Properties (pada Local Area Connection)
Pilih TCP/IP -> Properties
Pastikan IP dan DNS dalam keadaan Automatic

Tahap terakhir :
Sambungkan kabel ethernet dari modem anda ke port internet di wireless router. Ketika melakukan ini, pastikan modem anda dalam keadaaan mati atau tidak terhubung dengan listrik. Setelah kabel ethernet terhubung, baru nyalakan modemnya.

Selamat, jaringan anda sudah terbentuk dan koneksi internet anda sudah terbagi.
Kenapa saya pakai produk linksys sebagai contoh? Karena saya berhasil dengan menggunakan Linksys wireless router. Sedangkan Modem, modem apa saja bisa digunakan.

Sekian pengalaman dari saya, semoga dapat bermanfaat. Jika ada pertanyaan, bisa menghubungi saya di robert.suhim@gmail.com.

Salam

Thursday, December 27, 2007

Leopard's Screen sharing into Apple remote Desktop?

Seperti yang kita ketahui, Leopard memiliki fitur terbaru, yakni Screen Sharing antar komputer. Namun muncul pertanyaan, apa bedanya dengan apple remote desktop yang sudah dirilis apple terlebih dahulu? Saya mencoba mencari artikel tentang ini dan saya mendapatkannya. Memang screen sharing tidak bisa menjadi apple remote desktop, tapi paling tidak bisa didapat sebuah apple remote desktop versi lite. Berikut caranya.

  1. Cari aplikasi screen sharing lalu letakkan di dock. Bila tidak tahu lokasinya ada dimana, coba cari disini : /System/Library/CoreServices/Screen Sharing.app
  2. Buka terminal, lalu jalankan perintah berikut :
    defaults write com.apple.ScreenSharing ShowBonjourBrowser_Debug 1
Maka sekarang anda akan dapat membuka screen sharing dan melihat komputer - komputer yang terhubung dengan komputer anda dan bisa anda kendalikan.

Salam Macintosh