Showing posts with label Info. Show all posts

Wednesday, January 23, 2008

Leopard 10.5.2 Update Features

I think I really need to update my 10.5.1 to 10.5.2 because from the article I recently read, It contains some attractive things and support more "Apple things" like remote disc and wireless time machine using time capsule. Here is some sneak peak for 10.5.2 update I taken from babygotmac.

  1. Remote Disc Support
    This is the new feature of macbook Air because it has no optical drive. Remote disc settings has been added to 10.5.2
  2. Wireless Backup
    Time Machine can also use a disk connected to your Airport Express as a backup location. Maybe this can support Time Capsule for backing up file wirelessly
  3. Time Machine Dropdown Menu
    You can drop off Time Machine icon on your dock because now there is one on the dropdown menu bar.
  4. List view in Stacks
    I have written some information about List view in Bahasa Indonesia. But you can see the picture below

Tuesday, January 22, 2008

Macbook Air : Unboxed

Just a few minutes ago, I saw some photos of The New Macbook Air unboxed. It is compared to other Notebook and it's far thinner than othe notebook. I take it from flickr from someone in Japan I guest. Here is his gallery.

Friday, January 18, 2008

Manila Envelope for your Macbook Air

Macbook Air is launched on Macworld Expo 2008. And I have watched the ad for Macbook air. Wow, that's incredible that notebook can fit in the manila envelope.

The surprise news for you is there is a "Manila Envelope" sleeve for your Macbook Air. It's called Airmail. It's designed by two person, one is a full time touring musician and the other one is freelance journalist.

The idea comes from the manila envelope that Steve Jobs takes out Macbook Air from. And this sleeve is really just like a standard issue manila envelope. They're lined with fleece and even feature a tie enclosure. If I only see the picture, I can't decide weather it is Airmail or it is a standard manila envelope.

What does this things made of?

The AirMail laptop sleeve is handmade out of durable upholstery-grade vinyl, and lined with fuzzy, soft fleece. All AirMail sleeves have the same dimensions as standard interoffice manila envelopes, which will serve to remind you -- and everyone around you -- that your new MacBook Air really is the thinnest laptop in the world! (Airmail)
I'm sure it will really fit in your Macbook air. And to beautify while protecting your Macbook Air, you only spend about $29.95 to pre-order and it shipped in two weeks when Macbook Air does

Wednesday, January 16, 2008

The New Macbook Air

About few hours ago, I watched The live report from Macworld Expo and Steve Jobs officially launched the Macbook Air.

There were 4 things that Steve Jobs Officially Launched. First is the the new Time Capsule. It will accompany your Time Machine Features on your Leopard to backup files wirelessly

Second is some new features that added to iPhone and iPod touch. I'm so happy that my iPod touch has Mail.app in the body so I can organize my email from whereever I want. And there is Maps.app on my iPod. Unfortunately I have to pay about $20 for that update while iphone is free.. So sad to hear that. It need new version of iTunes to update that.

Third is Apple launched iTunes Movie Rentals. I think it is so crazy that we can rent a film online. But I still thinking how Apple secure their connection and make sure that no one can break the rules about renting.

The fourth is the most exciting things. "There is something In the air" That's the slogan. And It is true. The New Macbook Air was designed like a paper. It is the world's thinnest notebook. Steve Jobs calls it "The wireless machine". It's true because with Time capsule, you can backup your file wirelessly, With iTunes Movie Rental, you can watch movies wirelessly (By using internet), and so on. Make sure you check the technical Specs here.

With these 4 of new release of "Apple Things", Apple make a leap change in how we watch movie, creating document in the notebook that like a piece of paper, and so on.

I really consider all Apple things to furnished my own house someday because it's really integrating between one and another. It's so cool.


Regards

Robert

Sunday, January 6, 2008

Apple Script : Photoshop Batch Resizer

It's easy to put together a batch process in Photoshop to resize all the images in a folder to a certain height or width. However, if some of the photos are portraits and some are landscapes, they end up at different sizes. This script determines which dimension is the longest one and resizes that dimension to the specified number of pixels (set by the user).

set target_size to text returned of (display dialog "Enter target size of longest side in pixels:" default answer 2400)
set raw_folder to choose folder with prompt "Select originals folder:"
set live_folder to choose folder with prompt "Select target folder:"
tell application "Finder"
set itemList to files in raw_folder
end tell
repeat with an_item in itemList
tell application "Finder"
set current to an_item as alias
end tell

tell application "Adobe Photoshop CS"
activate
open current
set this_image to current document
set long_side to height of current document
set long_side_identity to 1
if width of current document > long_side then set long_side_identity to 2
if width of current document > long_side then set long_side to width of current document
if long_side > target_size as integer and long_side_identity = 1 then
resize image this_image height target_size as integer
end if
if long_side > target_size as integer and long_side_identity = 2 then
resize image this_image width target_size as integer
end if
tell current document
save as JPEG in live_folder
close
end tell
end tell
end repeat
This is set to save the images as JPEGs in Adobe Photoshop CS -- if you want it to save them in some other format, just change the line Save as JPEG in live_folder to Save as TIFF..., Save as Photoshop format..., Save as Photoshop EPS..., etc. (See the AppleScript dictionary for Photoshop for a complete list of formats.) If you want to use this script in Adobe CS3, change the line tell application "Adobe Photoshop CS"

Thanks to macosxhints for tips and tricks

Data Detector in Leopard's iChat

About 60 seconds ago, i read something tickling me about data detector from one of my source.

You can enable Data Detectors in iChat with one simple command in Terminal:

defaults write com.apple.iChat EnableDataDetectors 1

You can disable it using the same command, but change the '1' to a '0.' Now you get the fun job of calling your closest Mac-using relative and explaining Terminal so they can use a feature that Apple hid from public view for what I can only assume were valid reasons. I hope your aunt has her screen-sharing figured out.

Saturday, January 5, 2008

Warner Moving to Blu-Ray Disc

Warner Brothers announced today that they would be moving their titles from HD-DVD to the Blu-Ray format. Many have suggested that this marks the end of the next generation DVD battle, though two major studios continue to have exclusive HD-DVD distribution deals in place.
HD DVD, however, is not dead. Two major studios, Paramount Pictures and Universal Pictures, have deals in place to continue releasing their movies exclusively on HD DVD, as does DreamWorks Animation. Warner Brothers, part of Time Warner, will also continue to release its titles on both formats until the end of May.

Apple has been a member of the Blu-ray consortium's board of directors since 2005, but has not publicly announced their Blu-ray plans. Some expect Apple to officially launch Blu-ray support at Macworld San Francisco.

Friday, January 4, 2008

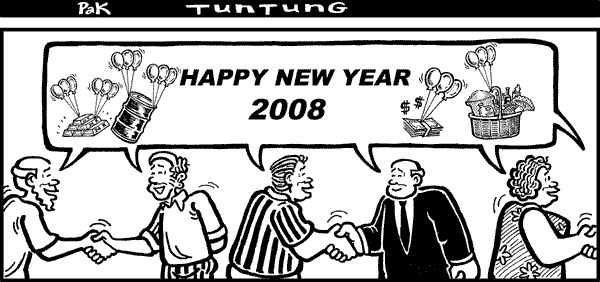
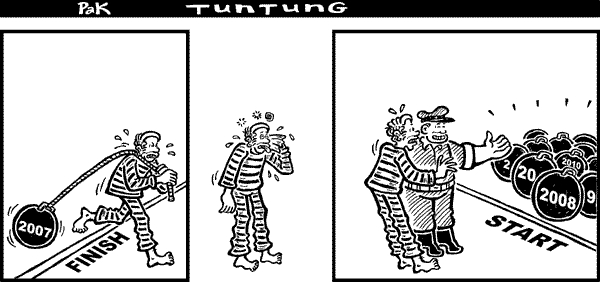
Happy New Year 2008

I Would like to say Happy new year 2008 to all of my reader here that always be loyal here. I'm very pleased that i can write something here and deliver it to the world as the name of Indonesia. I know it would be harder in this year but I believe that I can pass this year around and can get the best.


Image Courtesy of kartunmedan

Sunday, December 30, 2007

Share Your Internet Connection with Others

Beberapa hari yang lalu saya berhasil mensetting Wireless connection dan membagi koneksi internet saya untuk beberapa komputer yang ada di rumah saya. Mungkin saya bisa membagikan sedikit pengalaman saya.

Pertama - tama saya akan menjelaskan peralatan apa saja yang dibutuhkan.

  1. 1 buah cable modem (contoh: Cable Modem with USB and Ethernet Connections BEFCMU10)
  2. 1 buah switch router 4 port (contoh: Wireless-G Broadband Router WRT54G)
  3. Kabel LAN secukupnya, Kategori secukupnya adalah di sesuaikan dengan jarak modem ke router dan jarak router ke komputer.
Jika benda - benda tersebut sudah tersedia, tinggal melanjutkan langkah - langkah pemasangan hardware.

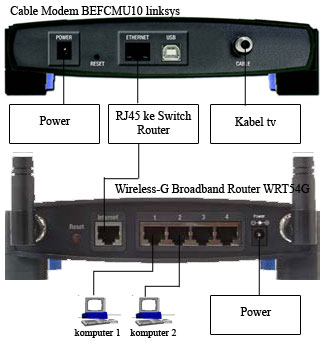
Bagan Jaringan
  1. Hubungkan kabel dari ISP anda ke cable modem
  2. Hubungkan power
  3. Sambungkan kabel LAN dari cable modem ke router di port internet
  4. Sambungkan salah satu port ke LAN card di komputer anda
Menurut pengalaman saya sebagai pengguna fastnet, cara diatas harus dilakukan bertahap dalam artian tidak bisa sekaligus karena penggunaan fastnet berdasarkan MAC address. MAC Address (Media Access Control) adalah sebuah alamat jaringan yang diimplementasikan pada lapisan data-link dalam tujuh lapisan model OSI, yang merepresentasikan sebuah node tertentu dalam jaringan. Karena itu saya membaginya dalam 3 tahapan yang dijelaskan secara rinci.

Tahap pertama :
Sambungkan kabel LAN dari wireless router anda ke LAN card di PC. Lalu buka web browser
Ketik 192.168.1.1 di address bar anda. Kalau error, coba 192.168.0.1. Masukkan
  • username : admin
  • password : admin
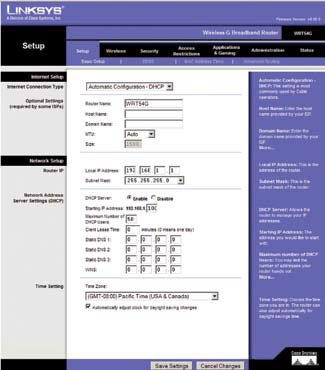
Lalu akan tampil halaman seperti berikut :

Ingat, setiap mau pindah halaman, pastikan anda mengklik tombol "Save Settings"
A. Setup - MAC Address Clone
Enable -> Klik "Clone Your PC MAC" Nanti MAC address dari PC anda akan otomatis diclone.

kenapa MAC perlu di clone? karena beberapa ISP mencatat MAC LAN card yang di pakai untuk terhubung ke internet. kalau MAC nya tidak di clone maka MAC nya akan lain dengan yang tercatat oleh ISP sehingga tidak akan mendapatkan IP dari DHCP server. karena di anggap berbeda.

B. Setup - Basic Setup
Internet Setup
pilih yang Automatic Configuration - DHCP,

Network Setup
Router IP 192.168.1.1
Network Address Server Settings (DHCP)

C. Wireless - Basic Wireless Settings
Wireless Network
Wireless Network Mode : mixed
Wireless Network Name (SSID) : Nama Jaringan anda. Misalkan "My WLAN"
Wireless Channel: channel yang mau dipakai WLAN anda, default saja dulu
Wireless SSID Broadcast : network namenya di sebarkan atau tidak, untuk sementara di enabled saja dulu (recomended :setelah bisa konek dengan sukses sebaiknya di disable agar tetangga anda tidak mendeteksi network anda)

D. Wireless - Wireless Security
Security Mode : Gunanya untuk memberi password pada Jaringan wireless anda supaya tidak sembarangan orang bisa masuk. Bisa dipilih WEP atau WAP sebagai pilihannya.

Tahap pertama sudah selesai, artinya jaringan anda sudah terbentuk. Tetapi tunggu dulu, sambungan ke modemnya belum dibentuk. Setelah tahap pertama selesai dan berjalan sebagaimana mestinya, kita tinggal menambahkan modem, supaya aliran data internet masuk ke jaringan yang sudah kita atur.

Tahap kedua :
Setting di PC anda. Ini juga penting supaya PC anda dapat menerima IP dari Wireless router anda.
Start -> Settings -> Control Panels -> Network Connections
Klik kanan -> Properties (pada Local Area Connection)
Pilih TCP/IP -> Properties
Pastikan IP dan DNS dalam keadaan Automatic

Tahap terakhir :
Sambungkan kabel ethernet dari modem anda ke port internet di wireless router. Ketika melakukan ini, pastikan modem anda dalam keadaaan mati atau tidak terhubung dengan listrik. Setelah kabel ethernet terhubung, baru nyalakan modemnya.

Selamat, jaringan anda sudah terbentuk dan koneksi internet anda sudah terbagi.
Kenapa saya pakai produk linksys sebagai contoh? Karena saya berhasil dengan menggunakan Linksys wireless router. Sedangkan Modem, modem apa saja bisa digunakan.

Sekian pengalaman dari saya, semoga dapat bermanfaat. Jika ada pertanyaan, bisa menghubungi saya di robert.suhim@gmail.com.

Salam

Tuesday, October 30, 2007

My Blogging Tips

Tak terasa sudah sekitar 3 bulan saya mengelola blog saya ini. Dulu saya berpikir keras bagaimana cara saya untuk mendapatkan pengunjung ke blog saya. Lama kelamaan saya mendapat sedikit jawaban tentang hal ini. Jadi bagaimana cara untuk membuat blog menjadi menarik dan bagaimana untuk menuis blog?

Kemarin malam seperti biasa, saya membaca beberapa artikel - artikel dan email - email yang cukup banyak di beberapa milis saya. Dari sana saya sering menemukan inspirasi baru untuk menulis sesuatu dalam blog saya. Jadi mulailah mencari beberapa site yang berhubungan dengan blog anda, Feed website tersebut sehingga anda akan cepat mendapatkan update dari mereka, dan ikuti milis yang sekiranya berhubungan dengan blog anda. Ini cara pertama.

Cara yang kedua adalah selalu melakukan promosi. Promosi yang mudah adalah seperti saya. Saya memiliki 5 alamat email di operator yang berbeda - beda. Isi dan peruntukan email tersebut juga berbeda - beda. Tetapi ada satu kesamaan dari kelima account email saya tersebut. Apa itu? Signature yang sama, yakni sebuah link ke www.thebantenz.blogspot.com. Jadi setiap saya mengirimkan email ke milis - milis saya, ke saudara dan kerabat, teman, ataupun rekan kerja dengan menyelipkan sebuah link ke blog saya. Cara yang mudah dan otomatis.

Selain dengan menyisipkan signature, saya juga aktif dalam beberapa forum - forum gadget dan Mac. Posting sesuatu yang berguna dalam forum tersebut dan sisipkan link anda dan mereka yang senang dengan postingan anda dalam forum tersebut akan berlomba - lomba masuk ke link blog anda. Penasaran apakah hal ini akan berhasil atau tidak? Percayalah karena kemarin orang yang voting di poll saya baru 5 orang. Sekarang?

Cara yang ketiga adalah jangan memaksakan diri untuk menulis. Menulis adalah sebuah seni menurut saya. Jadi bila memang tidak ada mood untuk menulis atau tidak tahu apa yang ingin ditulis, jangan menulis. Pembaca blog anda tidak akan suka dengan tulisan yang berantakan dan tidak karuan seperti tulisan saya malam ini. :-)

Tuesday, October 2, 2007

Google with different colour

Beberapa bulan lalu saya diberitahu oleh teman saya tentang sebuah search engine yang cukup baik. Namun karena saya kurang memperhatikan hal tersebut, saya tidak begitu memperdulikan search engine tersebut. teman saya memperkenalkan Blackle kepada saya. Katanya, kemampuan searchingnya mirip dengan google. Nama Blackle merupakan singkatan dari "Black Google". Begitu katanya.

Sekitar 2 hari yang lalu, saya membeli sebuah buku tentang kisah sukses google. saya membacanya sekitar sepertiga bagian. saya membaca bahwa google sebenarnya diperuntukkan bukan untuk bisnis, melainkan membantu pengguna internet dengan mengkatalogkan jutaan web, sehingga dapat dicari dengan mudah. Google berhasil memperkenalkan teknologinya, yakni PageRank yang sudah dipatenkan dengan bantuan Stanford University. Lalu setelah saya membaca buku tersebut, saya jadi ingat dengan Blackle yang diperkenalkan teman saya beberapa bulan lalu.

Baru kemarin saya membuka Blackle dan mencicipi sedikit fiturnya. Blackle diciptakan oleh seorang Doktor Psikologi Australia, Dr. Heap dan perusahaannya. Blackle diklaim mampu menghemat energi karena fondasi warna yang "Totally Black". Saya mulai tertarik dengan konsep hemat energi melalui warna yang gelap.

Menurut penelitian yang dilakukan oleh ecoiron, sebuah halaman web yang berwarna putih memerlukan daya sekitar 74 watts sedangkan untuk yang berwarna hitam hanya membutuhkan sekitar 59 watts.

Coba kita lihat Google yang asli dengan design minimalis dan background putih. Google mendapat sekitar 200 juta pencarian setiap hari. Dengan asumsi 1 kali pencarian adalah 10 detik, maka google menghabiskan sekitar 550.000 jam (200 juta dikalikan 10, lalu dibagi 3600). dengan asumsi kita menjalankan browser pada mode full screen, maka penghematan yang bisa dilakukan adalah sekitar 15 Watt (74-59 watt). Berarti dalam sehari akan dihemat sekitar 8,3 megawatt hours atau sekitar 3000 megawatt hours per tahun. dapat dihitung dengan rupiah, berapa penghematan yang dapat dilakukan dalam setahun. dan dapat dilihat bahwa terjadi penghematan dalam bentuk energi dalam jumlah yang cukup banyak.

Tetapi dengan studi lebih lanjut, diketahui bahwa hal ini hanya berlaku untuk monitor tipe CRT. Studi yang dilakukan oleh techlogg.com dengan melibatkan 27 monitor, mendapatkan hasil bahwa untuk monitor CRT, memang hasilnya cukup baik. Artinya memang warna bisa menghemat energi. Tetapi untuk teknologi LCD yang sekarang sedang marak dan diprediksi baik kedepannya, belum menunjukkan hasil yang signifikan.

But for the sake of fairness, here’s what we suggest – if you’re using a CRT monitor, you can save some power by using Blackle however it won’t be as much as its supporters will have you believe. We still think it’s around half.
If you’re using a 22-inch or smaller LCD screen, stick with Google if you want to keep power consumption to a minimum. However, if you have a 24-inch or larger LCD monitor, on average, Blackle is the cheaper option but it’s not a guarantee – as we said, we found one 28-inch LCD monitor that bucked that trend.
However, the power consumption difference between Google and Blackle on all 23 LCD monitors was as small as you could get – an increase of 100mW (0.1Watts). So after all that testing, we’re in a better position to say that anyone else that Blackle makes next to no difference, on average, with LCD monitors.

Ada cara lain yang lebih mudah untuk menghemat energi. Beberapa produsen notebook seperti Apple sudah membenamkan fungsi energy saver. Artinya komputer bisa mematikan monitor secara otomatis bila tidak sedang dipakai. cara ini selain menghemat baterai pada notebook, juga dapat mengurangi panas pada badan notebook. Masing - masing operating system memiliki konfigurasi yang berbeda - beda untuk energy saver ini. Untuk lengkapnya dapat dilihat di energy star for manually enabling power management.

Ada beberapa cara lain yang dapat ditempuh, antara lain :
  • Mematikan fungsi screen saver karena screen saver tidak akan menghemat baterai anda. Faktanya screen saver tidak hanya membuang energi, tetapi juga menahan harddisk untuk terus bekerja. jadi secara tidak langsung, harddisk juga akan memakan energi.
  • Sebagian aplikasi 3rd party memiliki fitur untuk berjalan di background. Ini seringkali membuat PC tidak bisa masuk ke mode sleep atau hibernate.
  • Beberapa website tidak membiarkan sleep mode selama animated banner mereka berjalan. Matikan website tersebut, dan biarkan PC anda "tidur"
  • Matikan PC setelah tidak digunakan.
  • Kurangi brightness dari monitor anda bila tidak diperlukan.

Ada pepatah yang mengatakan Hemat itu Pangkal Kaya. Hemat energi diperlukan supaya energi tersebut juga tetap berlimpah sampai ke anak cucu kita. Tidak usah berpikir terlalu jauh mengenai konsep hemat energi. Banyak yang dapat dilakukan oleh diri anda sendiri, mulai dari desktop anda pribadi.


Salam teknologi,
Robert


Sunday, August 26, 2007

Overclocking Competition at Ratu Plaza.

Beberapa hari yang lalu saya mengunjungi sebuah pusat komputer di jakarta pusat, yakni Ratu Plaza. Saya tertarik dengan iklan Overclocking competition yang dipasang di majalah komputer langganan favorit saya. Akhirnya saya datang kesana dengan harapan dapat melihat sebuah kompetisi yang menarik.

Ketika saya sampai disana, saya merasa lokasinya agak sepi, atau mungkin saya datang terlalu pagi, yakni sekitar jam 10 pagi. Saya kebetulan bersama dengan 2 orang teman saya agak sedikit bosan dan memutuskan untuk berjalan - jalan melihat - lihat IT related things yang dipajang di etalase toko di sana.

Sekitar 2 jam saya berkeliling, saya memutuskan untuk kembali ke arena lomba dan berharap sudah ada perkembangan. Sudah ada sedikit perkembangan memang. Sudah sedikit lebih ramai.

Seperti yang dapat dilihat di foto yang saya upload, lokasi perlombaan agak sedikit sepi. Namun banyak hal - hal menarik yang dipajang disana. Rata - rata semuanya PC high end dengan modifikasi dan memaksimalkan kerjanya. bahkan menurut saya sudah "dipaksa" bekerja lebih.


Asap - asap dry ice bertebaran semakin memeriahkan suasana. Cukup menarik memang untuk sebuah kompetisi Overclocking.
I hope that next time the same event can grow bigger every year. I think it's show our creativity, Indonesian people

More Photos on My Multiply blog